

- Making ice cream at home is one of those timeless activities that brings both fun and satisfaction. There’s something magical about transforming simple ingredients into creamy, decadent ice cream in the comfort of your own kitchen. Whether you’re a seasoned pro or a first-time maker, the process of creating your own ice cream allows you to experiment with flavors and textures, resulting in a treat that’s tailored to your taste.
- Using an ice cream maker makes the process even easier, taking out much of the guesswork and providing you with smooth, restaurant-quality ice cream in no time. With a few essential ingredients and the right equipment, you’ll be scooping out freshly made ice cream in less than an hour. The best part? You get to enjoy the fruits of your labor — from rich vanilla to creative combinations with cookies, nuts, or even fruit. All it takes is the right tools, a little patience, and a dash of creativity.

Table of Contents
Ingredients and Equipment
- Before you get started, here’s what you’ll need to make ice cream in an ice cream maker
Ingredients Needed:
- Heavy Cream: This is the base for the creamy texture of your ice cream. It adds richness and smoothness.
- Whole Milk: For the perfect balance, whole milk provides some structure without being too heavy.
- Sugar: Sweetness is key in ice cream! You’ll need sugar to sweeten the mix and help with the freezing process.
- Salt: A pinch of salt enhances the overall flavor and balances the sweetness.
- Vanilla Extract or Vanilla Bean: The most common flavoring for homemade ice cream. If you’re using a vanilla bean, you’ll split it lengthwise and scrape out the seeds for a rich, aromatic flavor. You can also use other flavoring extracts or try mixing in different flavor combinations!
- Optional Add-ins: This is where your creativity can shine! You can fold in mix-ins like crushed cookies, chocolate chips, chopped nuts, or fresh fruit after churning for extra flavor and texture.
Essential Equipment:
- Ice Cream Maker: The star of the show! Ice cream makers come in different models. Some require pre-freezing the bowl, while others have built-in freezing capabilities. Either way, it helps ensure smooth, evenly churned ice cream.
- Medium Saucepan: For heating and mixing your ingredients.
- Mixing Bowl: To combine your ingredients before chilling the mixture.
- Airtight Container for Storage: Once your ice cream is ready, you’ll need a container to store it in the freezer. Airtight containers help preserve the texture and prevent ice crystals from forming.
Step 1: Prepare the Ice Cream Base
Combine the Ingredients:
- To get started, you’ll want to combine the key ingredients — heavy cream, whole milk, sugar, salt, and vanilla — in a medium saucepan. Begin by pouring the heavy cream and whole milk into the pan. Then, add the sugar and a pinch of salt to the mixture. If you’re using vanilla extract, add it at this stage, or if you’re opting for a vanilla bean, split the bean lengthwise, scrape out the seeds, and stir them into the mixture. Be sure to stir well to ensure everything is evenly distributed before moving on to the next step.
Warm the Mixture:
- Place the saucepan over medium heat and gently warm the mixture. Stir constantly to help the sugar dissolve into the liquids. This step is crucial, as it ensures that your sugar is completely dissolved, preventing any graininess in the final product. However, it’s important to avoid boiling the mixture — once it reaches a gentle simmer, remove it from the heat. Boiling could alter the texture of the ice cream, so keep a careful eye on it as it heats.
Chill the Mixture:
- After removing the saucepan from the heat, let the mixture cool slightly for a few minutes. Then, cover the saucepan and refrigerate the base for at least 2 hours or, for optimal flavor, overnight. Chilling the mixture allows the flavors to meld and deepens the vanilla flavor, resulting in a richer ice cream. The cooling process also ensures that your mixture is cold enough to churn effectively once it’s ready for the ice cream maker.
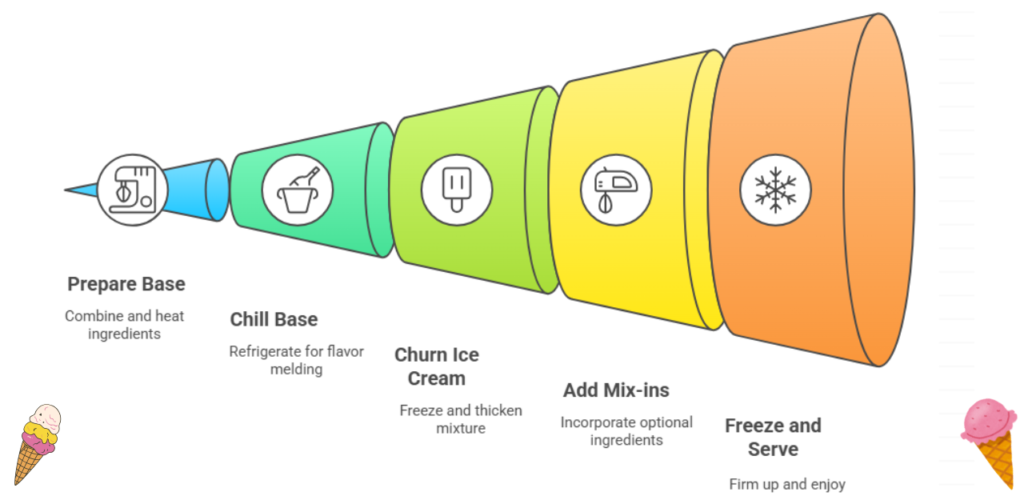
Step 2: Churn the Ice Cream
Prepare the Ice Cream Maker:
- If your ice cream maker requires pre-freezing, it’s crucial to make sure the bowl is frozen solid before you start the churning process. Depending on the model of your ice cream maker, this could take anywhere from a few hours to overnight. Pre-freezing the bowl is essential because it allows the ice cream to churn properly and freeze evenly. Once the bowl is properly frozen, set it into the machine according to the manufacturer’s instructions.
Churn the Ice Cream:
- Once your ice cream base is chilled and your machine is ready, it’s time to churn! Pour the chilled mixture into the prepped ice cream maker bowl. Follow the manufacturer’s instructions for your specific machine, but the typical churning time is between 20 to 30 minutes. During this time, the mixture will slowly freeze and thicken as the churning action incorporates air, giving your ice cream its smooth texture. Keep an eye on it — when it reaches the consistency of soft-serve, it’s done!
Check Consistency:
- As the ice cream churns, you’ll notice it gradually thickening. To check if it’s ready, dip a spoon or spatula into the mixture. If the ice cream holds its shape and has the soft, creamy texture of soft-serve, it’s time to stop churning. If you prefer a firmer texture, transfer the ice cream to an airtight container and freeze it for a few additional hours to allow it to harden. This extra time in the freezer will give you that perfect scoopable texture you’re looking for.
Kitchenif Digital Ice Cream Maker
- 2 YEAR WARRANTY
- INTERNATIONAL DURABLE QUALITY
Step 3: Add Mix-ins (Optional)
Optional Add-ins:
- Once your ice cream has reached the soft-serve consistency and you’re happy with the texture, it’s time to add some fun mix-ins! This step allows you to get creative and personalize your ice cream with all sorts of tasty treats. Whether it’s crushed cookies, chopped nuts, fresh berries, or chocolate chips, the options are endless.
- To add your mix-ins, simply gently fold them into the churned ice cream. This ensures they’re evenly distributed throughout without deflating the ice cream. Add-ins like cookies or candy should be chopped into small pieces for the best result, while fresh fruit can be added whole or sliced. Just be mindful not to overmix, as you want the add-ins to stay intact and not get mushy. Once the mix-ins are evenly incorporated, your ice cream is ready for the next step!
The Better Home Fumato Ice Cream Maker For Home 1.5 Litres

- MULTIFUNCTIONAL USAGE
- LARGE CAPACITY
Step 4: Freeze and Serve
Freeze the Ice Cream:
- Now that your ice cream is churned and mixed to perfection, it’s time to transfer it to an airtight container for storage. This is a crucial step — by sealing the ice cream in a container, you prevent ice crystals from forming and preserve the smooth texture. Place the container in the freezer for at least 2 hours to allow the ice cream to harden and firm up to a scoopable consistency. The longer it freezes, the firmer and more satisfying the texture will be when you serve it.
Serving Tips:
- When you’re ready to serve, let the ice cream sit out at room temperature for a few minutes to soften slightly, making it easier to scoop. For an extra indulgent treat, consider adding toppings like whipped cream, chocolate sauce, or even some fresh fruit like strawberries or bananas. You can also serve it in a cone, a bowl, or alongside a slice of cake or pie for an added touch of dessert perfection!
Conclusion
- Making homemade ice cream is more than just a recipe — it’s an experience. From choosing your flavors to adding those personalized mix-ins, the process is as enjoyable as the final result. Whether you stick to a classic vanilla or go wild with creative combinations, there’s no wrong way to make ice cream at home. So, why not experiment with different flavors, textures, and toppings until you find your perfect scoop?
- We’d love to hear about your ice cream-making adventures! Share your creations, favorite mix-ins, or any tips you’ve learned along the way in the comments. The kitchen is your playground, and with your ice cream maker, you’re ready to create some sweet memories. Happy churning! 🍦 Ice Cream Maker Under Rs.5000
- Bread Maker: Looking to make fresh, homemade bread? Our guide on the best bread makers will help you find the perfect appliance for soft, fresh loaves every time.
- Water Purifier: To complete your kitchen setup, don’t forget about a high-quality water purifier. Clean water is essential for your health, just like healthy cooking with an air fryer!
FAQ
1. Do I need to pre-freeze the ice cream maker bowl?
- It depends on the type of ice cream maker you have. Some models require the bowl to be pre-frozen for several hours or overnight, while others have built-in freezing capabilities. Be sure to check the manufacturer’s instructions for your specific model.
2. Can I make dairy-free ice cream in an ice cream maker?
- Yes! You can make dairy-free ice cream by using alternatives like coconut milk, almond milk, or oat milk instead of whole milk and cream. Just replace the dairy ingredients with your preferred non-dairy options, and follow the same steps for making the base.
3. How long does it take to churn ice cream in an ice cream maker?
- Typically, it takes about 20 to 30 minutes to churn ice cream in an ice cream maker. The time can vary depending on the model of your ice cream maker and the consistency of the ice cream base. It will be ready once it reaches a soft-serve consistency.
4. Can I add mix-ins like cookies or nuts during the churning process?
- Yes! You can add mix-ins such as cookies, nuts, chocolate chips, or fruit after the ice cream has finished churning. Gently fold them into the ice cream to distribute evenly, ensuring they don’t break down too much during the process.
5. How long should I freeze the ice cream after churning?
- After churning, transfer the ice cream to an airtight container and freeze it for at least 2 hours, or until it hardens to your desired consistency. For a firmer texture, you can leave it in the freezer for longer.


Pingback: CMC and GMS Powder in Ice Cream: Uncover the 4 Key Differences and Their Incredible Benefits - Premium Kitchen Tech
Pingback: Top-Rated Slow Cookers in India: Which One is the Best for Your Kitchen in 2025? - Premium Kitchen Tech